How to Register and Verify Account on Bitget
How to Register on Bitget
How to Register Bitget Account with Phone Number or Email
1. Go to Bitget and click [Sign up] on the upper right corner page and the page with the sign-up form will appear.

2. You can perform Bitget registration via a social network (Gmail, Apple, Telegram) or manually enter the data required for the registration.
3. Select [Email] or [Mobile] and enter your email address/phone number. Then, create a secure password for your account.
Note:
- Your password must contain 8-32 characters
- At least one number
- At least one uppercase letter
- At least one special character (Only support: ~`!@#$%^*()_-+={}[]|;:,.?/)
Read and agree to Bitget’s User Agreement and Privacy Policy, then click [Create Account].


4. Perform the verification procedure


5. You will receive a message/email with a code to enter on the next pop-up screen. After submitting the code, your account will be created.

6. Congratulations, you have successfully registered on Bitget.

How to Register Bitget Account with Apple
Furthermore, you can sign up using Single Sign-On with your Apple account. If you wish to do that, please follow these steps:
1. Visit Bitget and click [Sign up].

2. Select [Apple] icon, a pop-up window will appear, and you will be prompted to sign in to Bitget using your Apple account.

3. Enter your Apple ID and password to sign in to Bitget.


4. Click [Continue].

5. After that, you will be automatically redirected to the Bitget platform.

How to Register Bitget Account with Gmail
Also, you have an option to register your account through Gmail and you can do that in just a few simple steps:
1. Head over to the Bitget and click [Sign up].

2. Click on the [Google] button.

3. A sign-in window will be opened, where you put in your Email or phone. Then click [Next]

4. Then enter the password for your Gmail account and click [Next].

5. Read and agree to Bitget’s Terms of Service and Privacy Policy, then click [Confirm].

6. Read and agree to Bitget’s User Agreement and Privacy Policy, and click [Sign up].

7. After that, you will be automatically redirected to the Bitget platform.

How to Register Bitget Account with Telegram
1. Head over to the Bitget and click [Sign up].

2. Click on the [Telegram] button.

3. A sign-in window will be opened, where you put in your Email or phone. Then click [Next]

4. Open your Telegram and confirm

5. Read and agree to Bitget’s User Agreement and Privacy Policy, and click [Sign up].

6. After that, you will be automatically redirected to the Bitget platform.

How to Register an Account on Bitget App
More than 70% of traders are trading the markets on their phones. Join them to react to every market movement as it happens.
1. Install Bitget app on Google Play or App Store.

2. Click on the [Avatar], choose [Sign up]


3. Select a registration method, you can choose from Email, Mobile number, Google account, or Apple ID.

Sign up with your Google account:
4. Select [Google]. You will be prompted to sign in to Bitget using your Google account. Tap [Next].


5. Complete the verification

6. Type in the verification code that has been sent to your Google account

7. Congratulations! You have successfully created a Bitget account.

Sign up with your Apple account:
4. Select [Apple]. You will be prompted to sign in to Bitget using your Apple account. Tap [Continue].


5. Create your account, and type in the verification code. Then read and agree to Bitget’s User Agreement and Privacy Policy, and click [Sign up].

6. Type in the verification code that has been sent to your email account

7. Congratulations! You have successfully created a Bitget account.

Sign up with your email/phone number:
4. Select [Email] or [Phone Number] and enter your email address/phone number. Then, create a secure password for your account.


Note:
- Your password must contain 8-32 characters
- At least one number
- At least one uppercase letter
- At least one special character (Only support: ~`!@#$%^*()_-+={}[]|;:,.?/)
5. You will receive a 6-digit verification code in your email or phone. Enter the code within 10 minutes and tap [Submit].

6. Congratulations! You have successfully created a Bitget account.

Frequently Asked Questions (FAQ)
How to Bind and Change Mobile
How to Bind and Change Mobile
If you need to bind or change your mobile phone number, please follow the steps below:
1. Bind mobile phone number
1) Go to the homepage of Bitget website, log in to your account, and click on the person icon in the upper right corner
2) Click the Security settings in the personal center to bind the mobile phone number
3) Enter the mobile phone number and the received verification code for binding operation
2. Change mobile phone number
1) Go to the homepage of Bitget website, log in to your account, and click on the person icon in the upper right corner
2) Click Security Settings in the Personal Center, and then click change in the phone number column
3) Enter the new phone number and SMS verification code to change the phone number
Binding/changing of mobile phone number can only be operated on Bitget PC
I forgot my password | How to reset password on Bitget
Access your Bitget account effortlessly by following our step-by-step guide on how to log in to Bitget. Learn the login process and get started with ease.
Visit the Bitget App or Bitget’s Website
1. Find the login entrance
2. Click Forget Password
3. Enter the mobile phone number or email address you used when registering
4. Reset password-confirm password-get verification code
5. Reset password
Bitget KYC Verification | How to pass the ID Verification Process?
Discover how to successfully pass the Bitget KYC (Know Your Customer) Verification process. Follow our guide to complete ID Verification with ease and secure your account.
1. Visit Bitget APP or PC
APP: Click the person icon in the upper left corner(it requires that you are currently logged in
PC: Click the person icon in the upper right corner (it requires that you are currently logged in)
2. Click ID Verification
3. Select your region
4. Upload relevant certificates (Front and back of the certificates + holding the certificate)
App supports taking photos and uploading certificates or importing certificates from photo albums and uploading
PC only supports importing and uploading certificates from photo albums
5. Wait for verification by customer service
How to Verify account on Bitget
How to Complete Identity Verification
Where can I get my account verified?
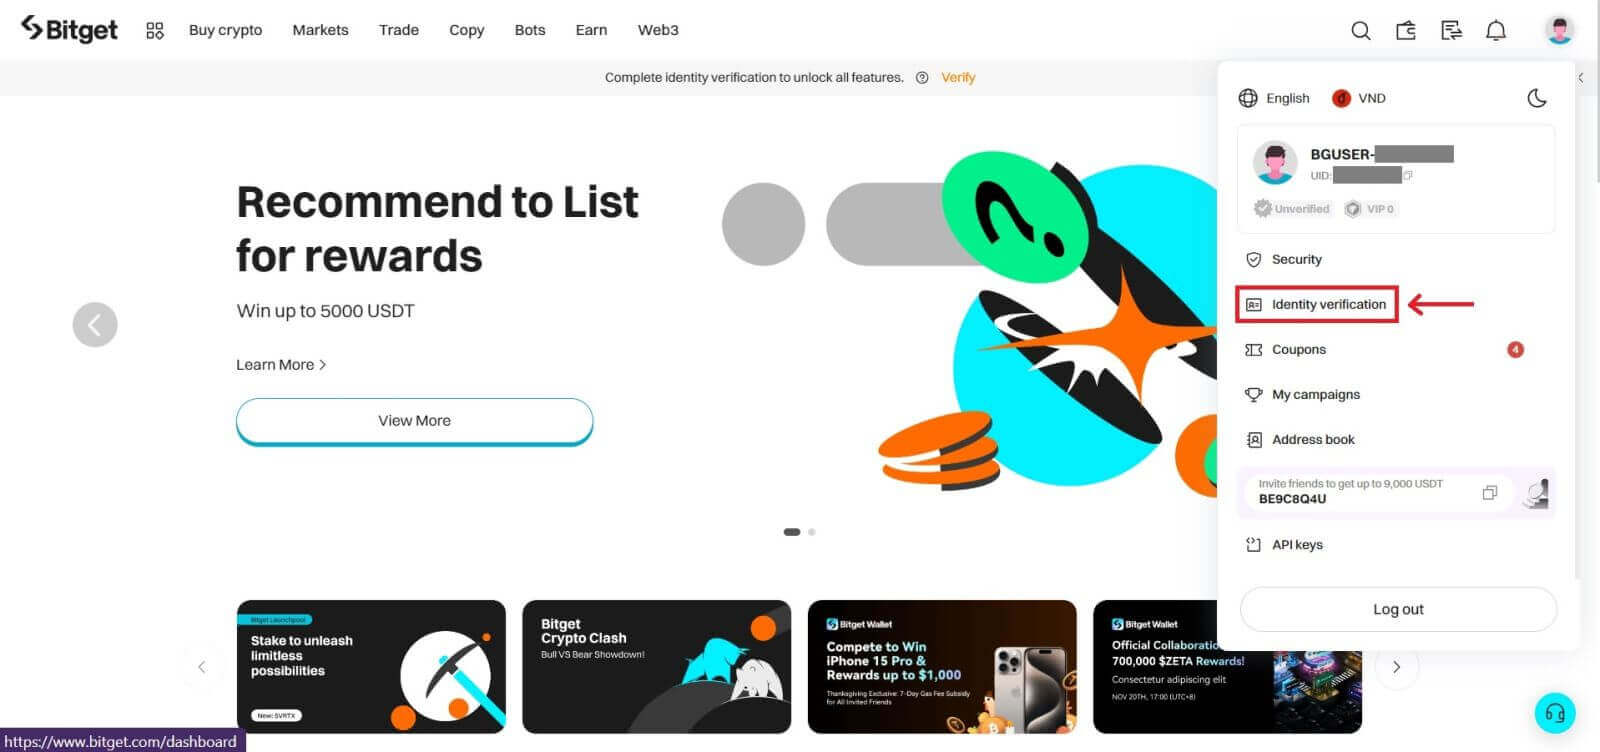
If you’re using a PC, log into your account and hover over your avatar. Then click on [Identity verification].
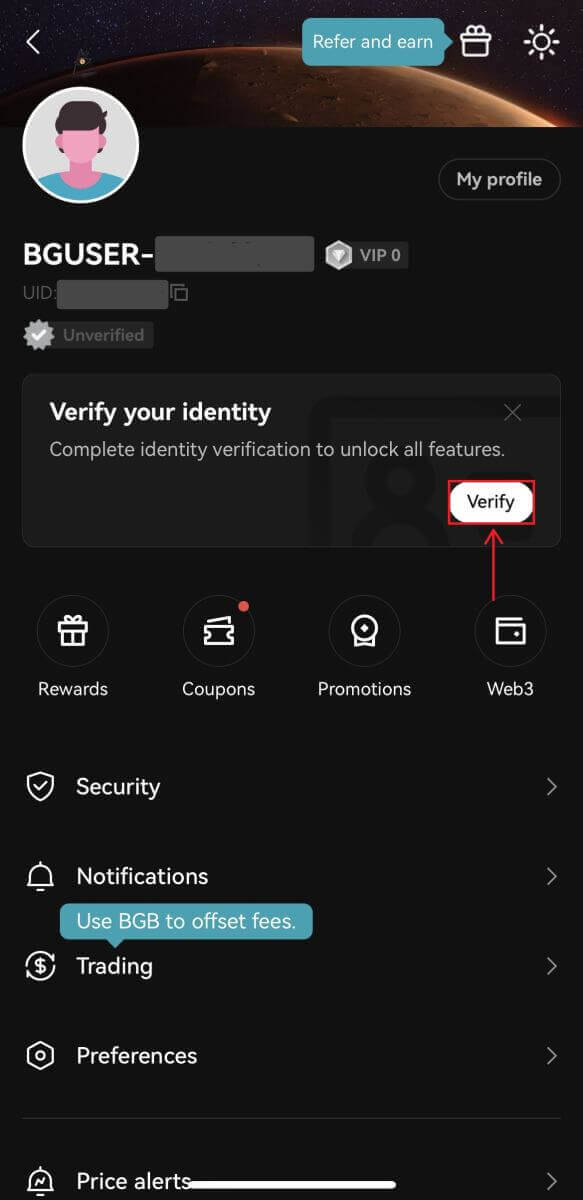
If you’re using the Bitget app, go to your Dashboard and click on [Verify].
How to complete Identity Verification? A step-by-step guide
1. Log in to your Bitget account, go to Dashboard - [Identity verification].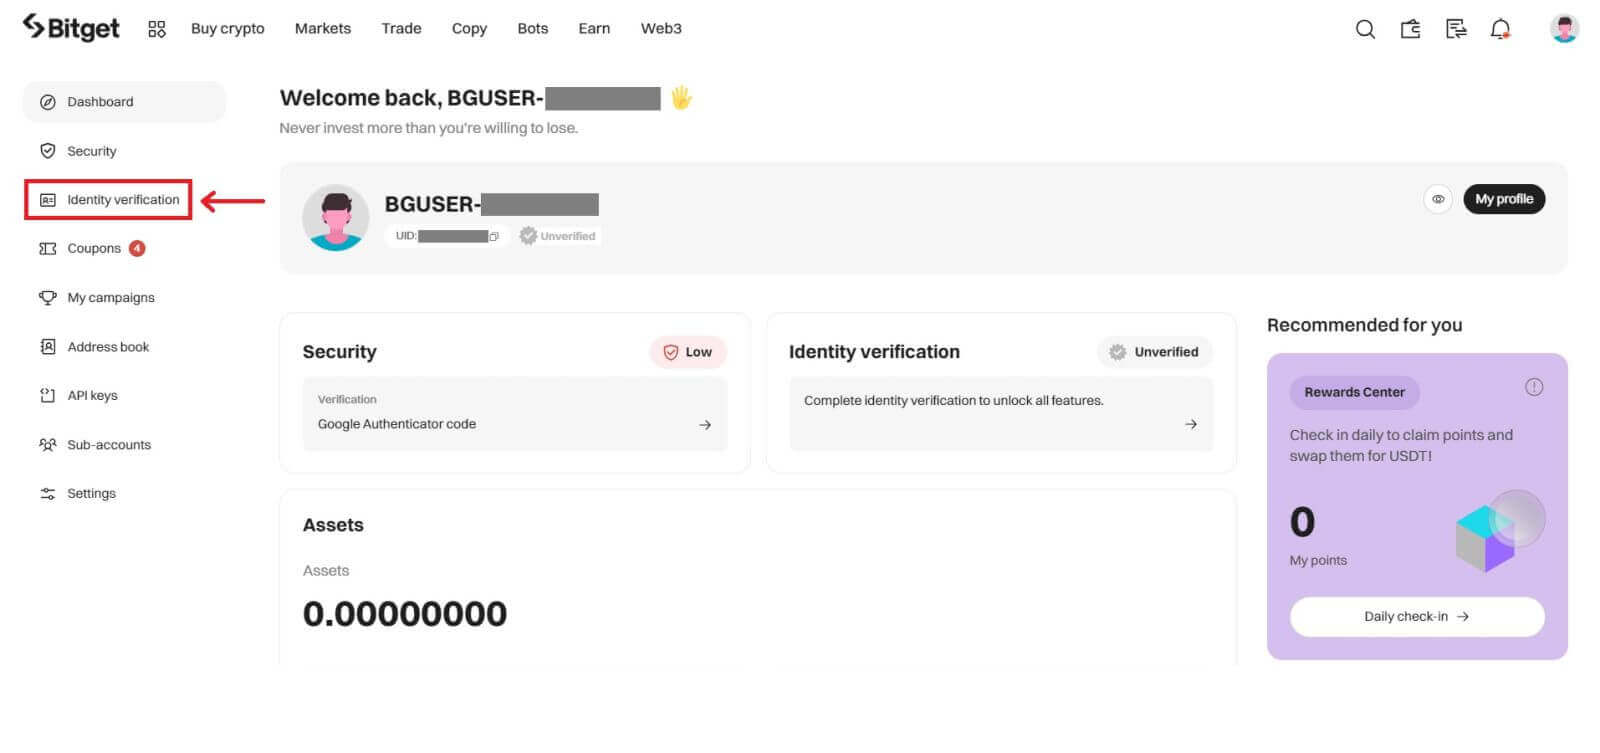
2. Here you can see [Business verification], and [Individual Verification] and their respective deposit and withdrawal limits.
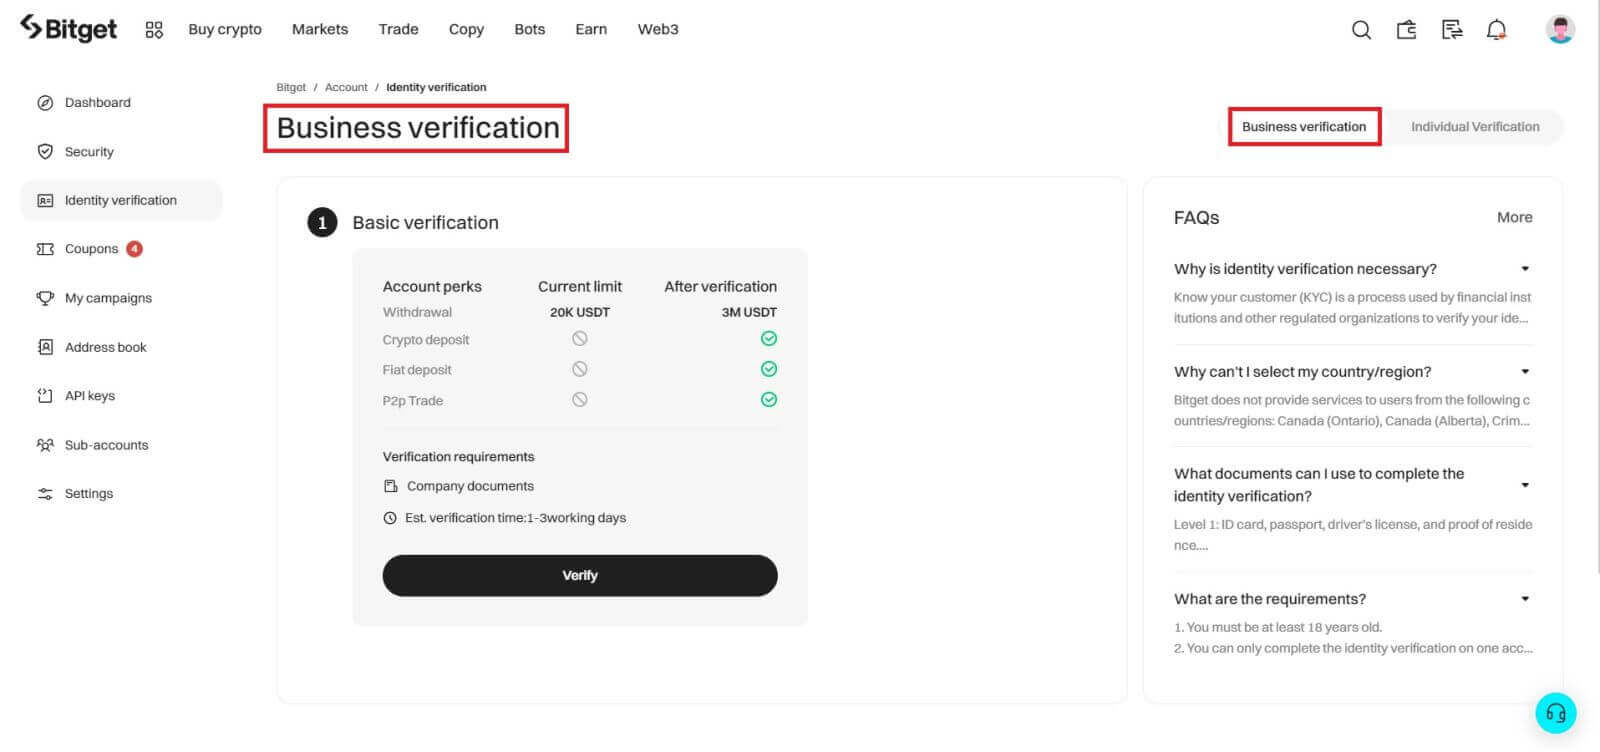
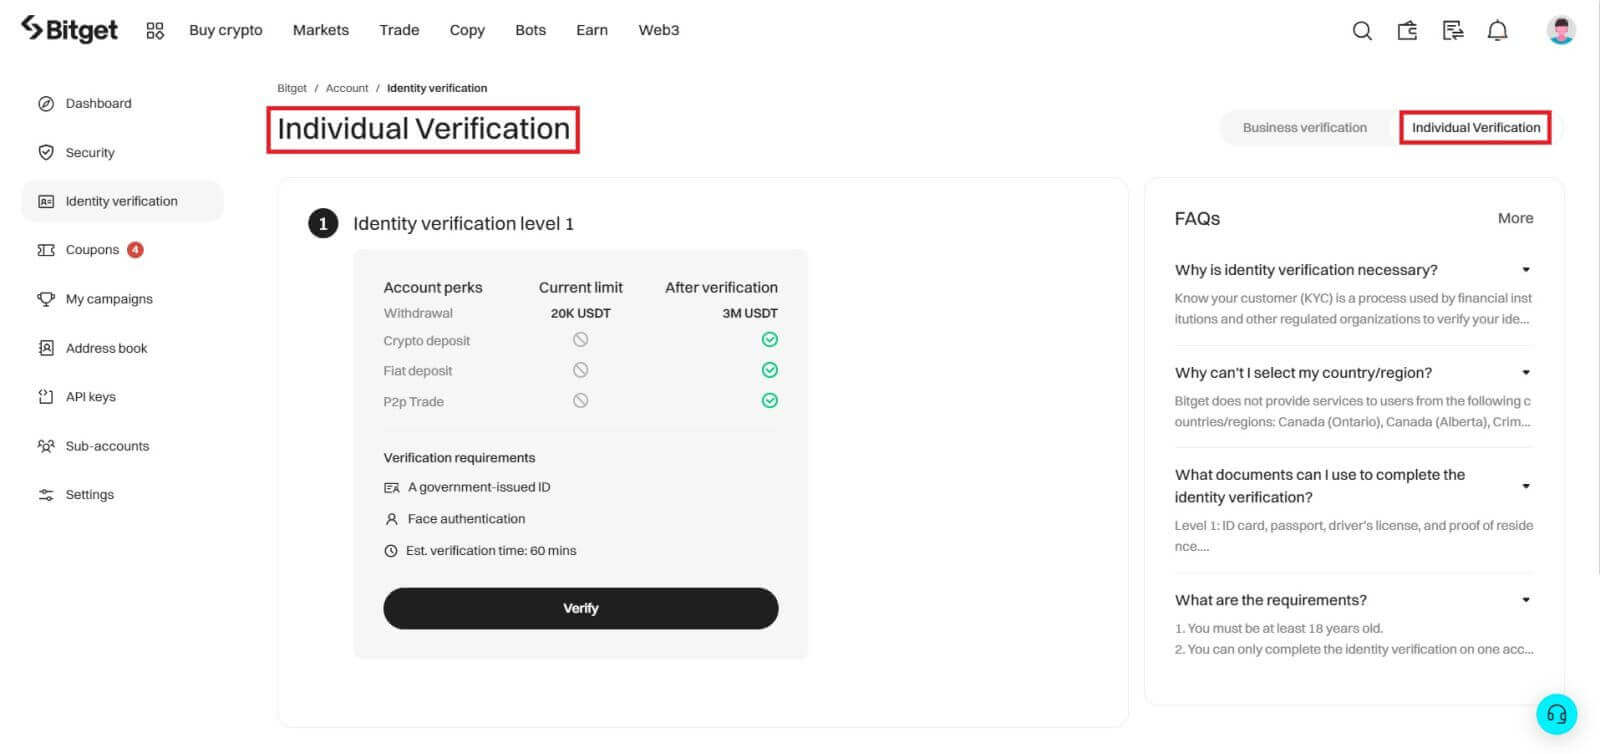
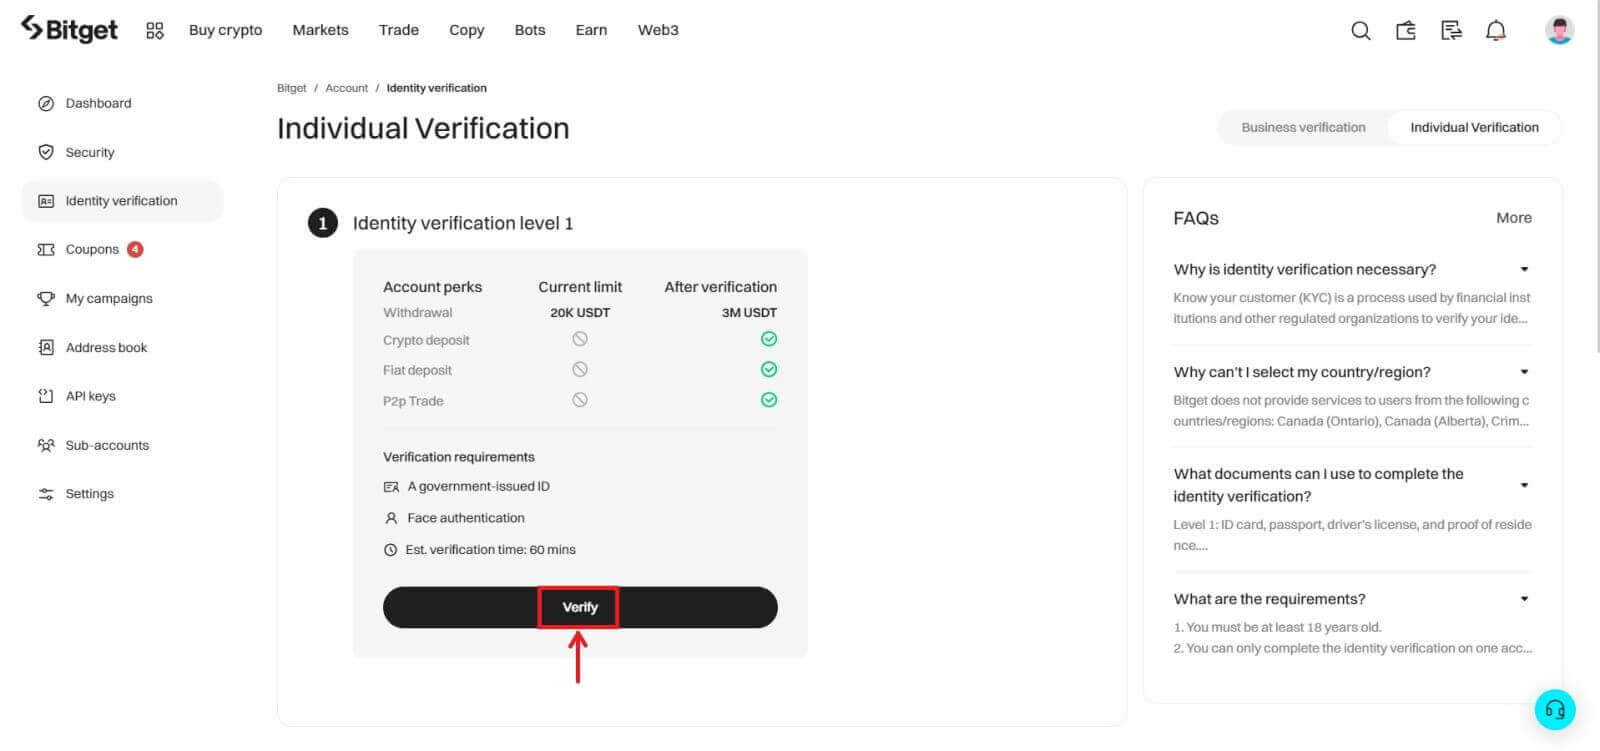
3. Click [Verify] to start the verifying process.
4. Select your country of residence. Please ensure that your country of residence is consistent with your ID documents. Choose the type of ID and the country your documents were issued. Most users can choose to verify with a passport, ID card, or driving license. Please refer to the respective options offered for your country.
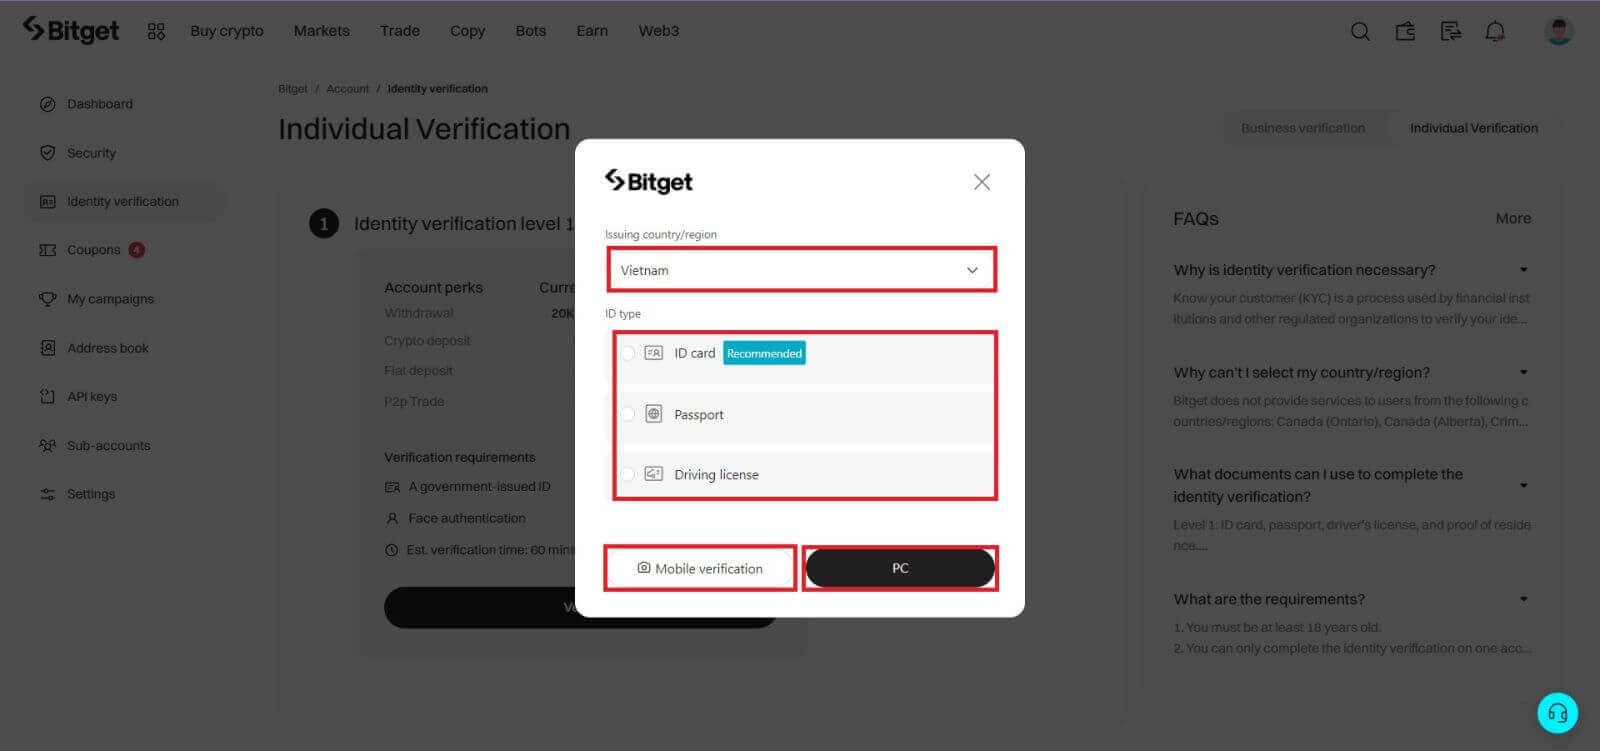
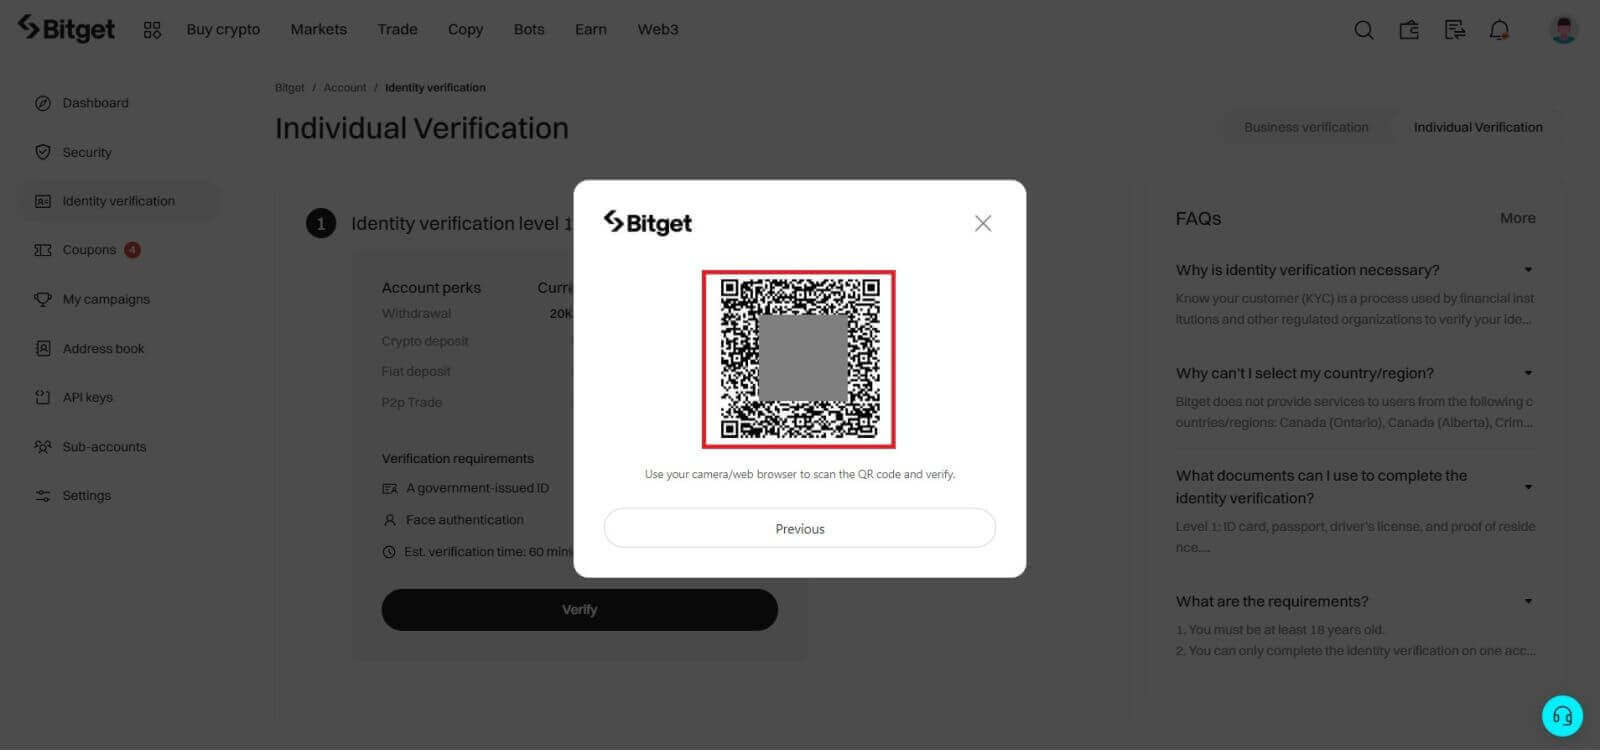
If you wish to continue using the mobile version, you can click on [Mobile verification] scan the QR code. If you want to continue using the desktop version, click on [PC].
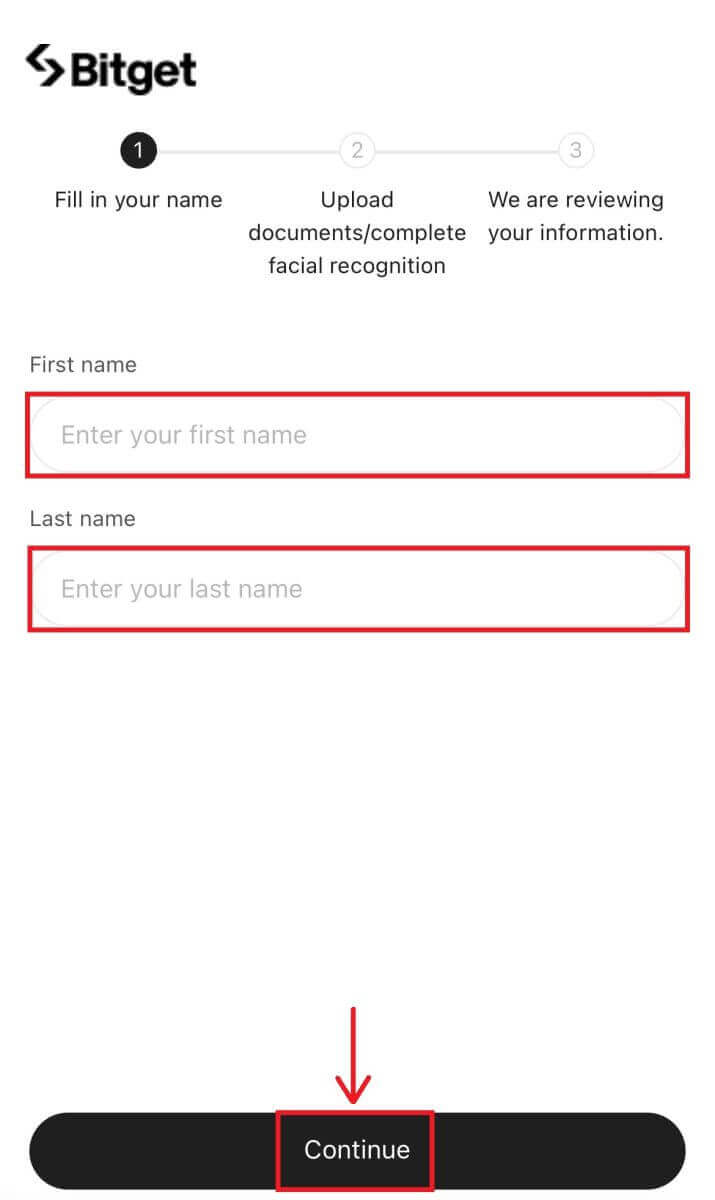
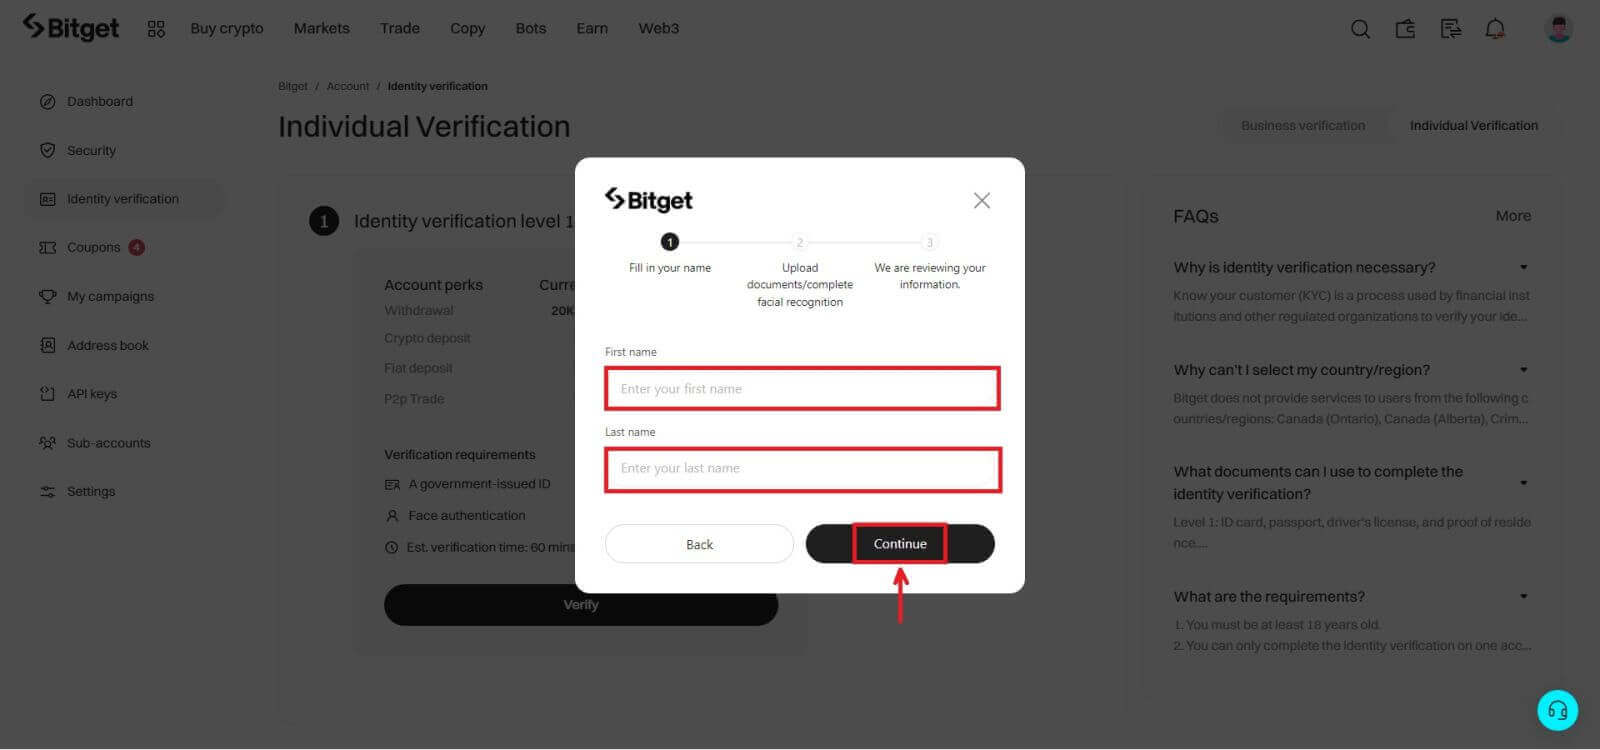
5. Enter your personal information and click [Continue].
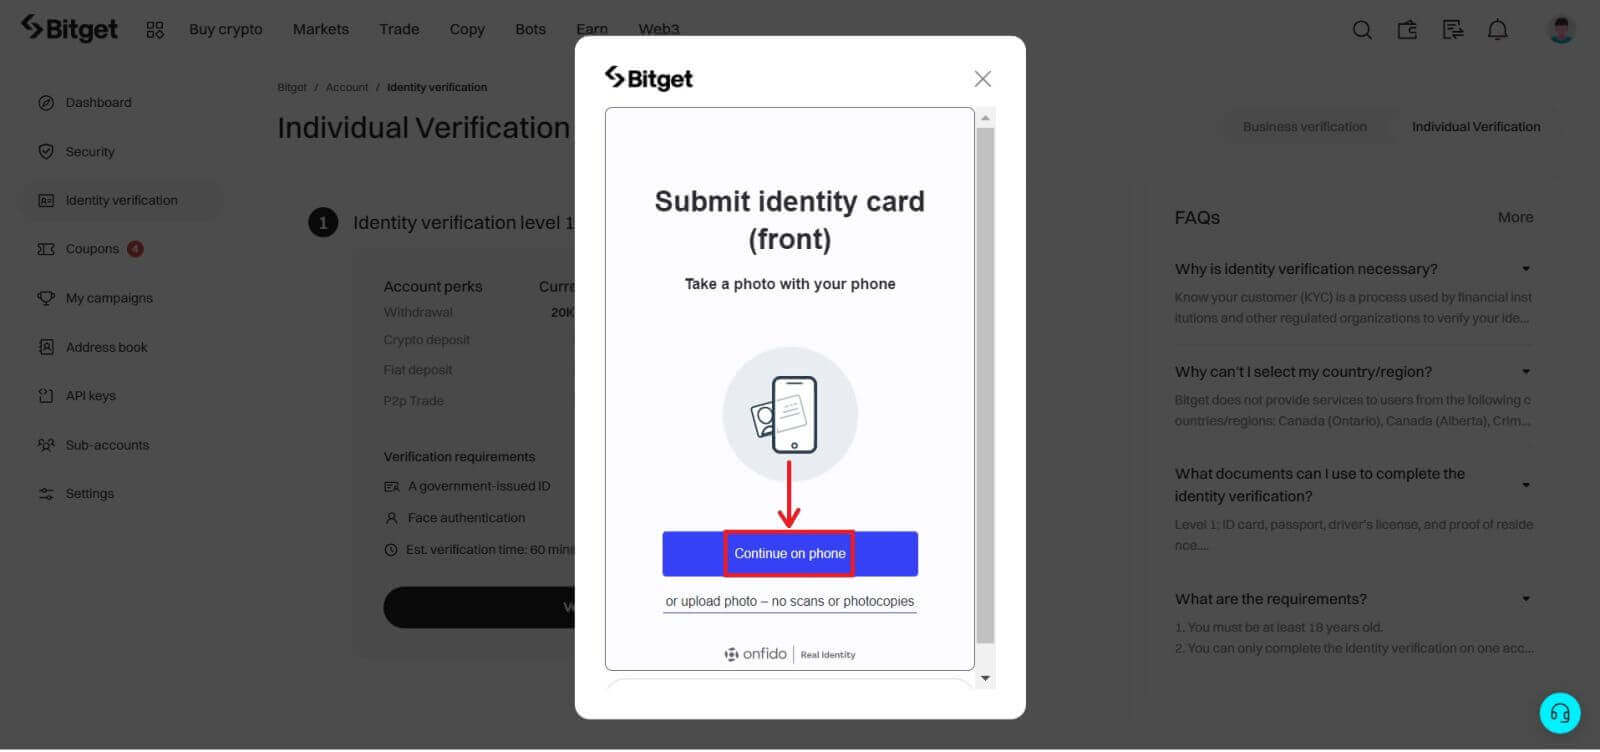
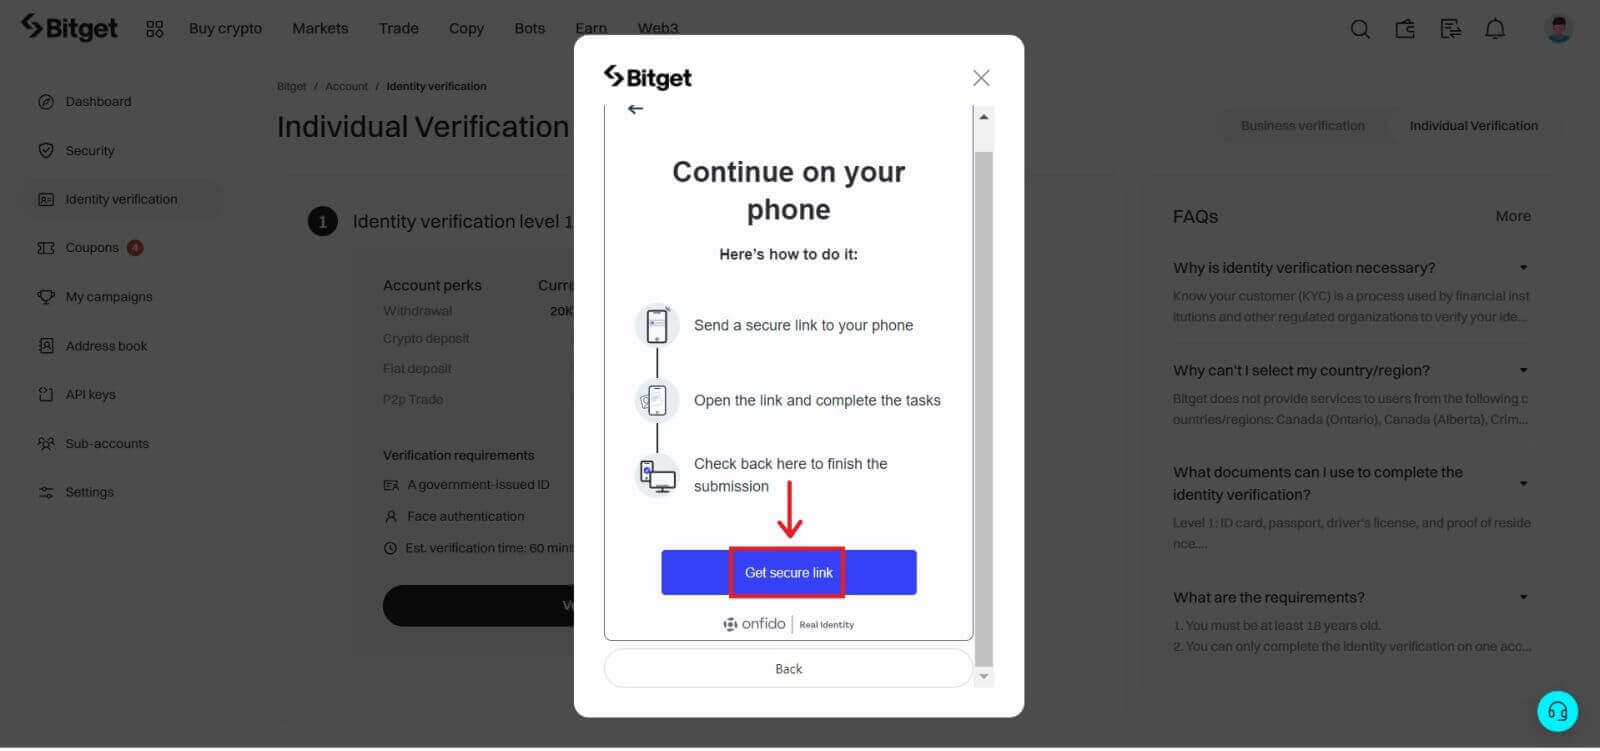
6. Upload a photo of your ID. Depending on your selected country/region and ID type, you may be required to upload either a document (front) or photo (front and back).
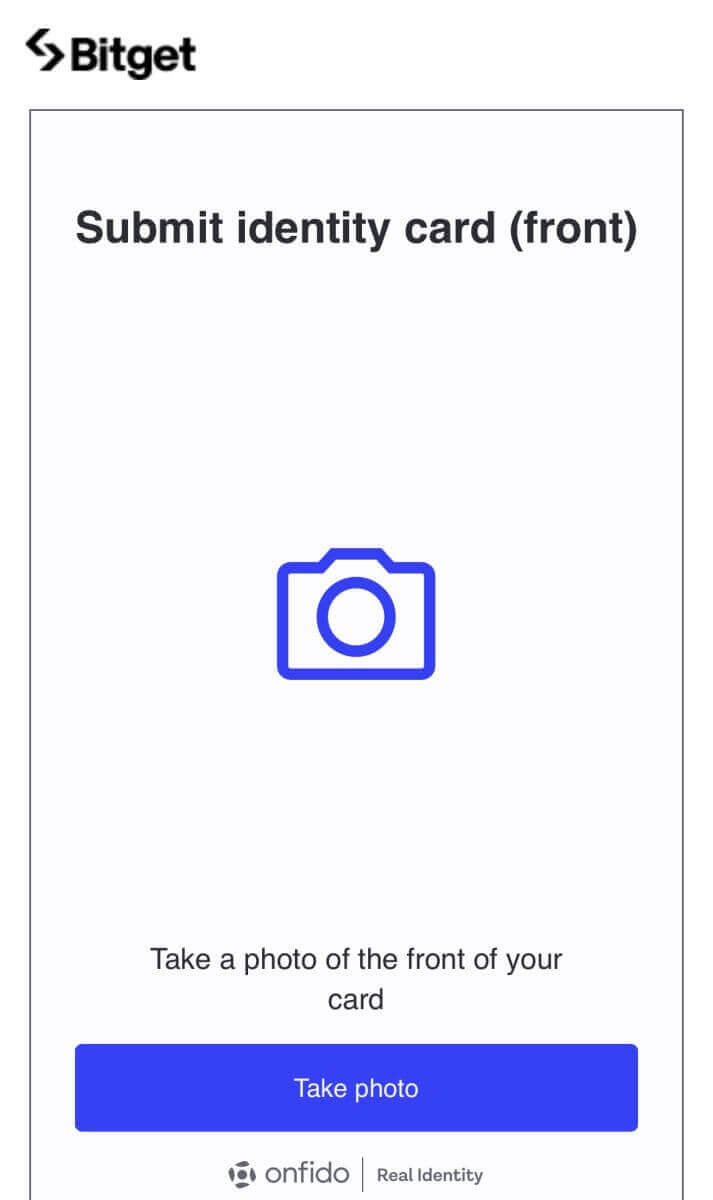
Note:
- Make sure that the document photo clearly displays the user’s full name and date of birth.
- Documents must not be edited in any way.
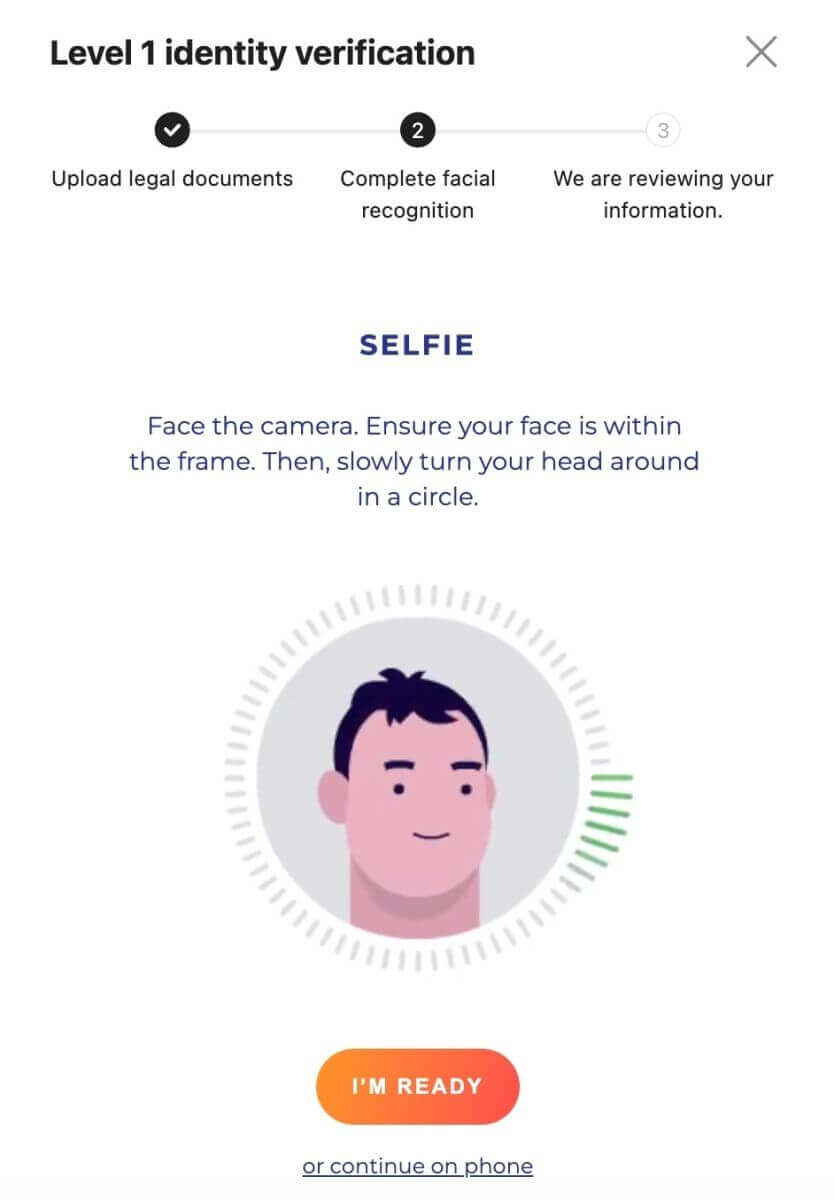
7. Complete facial recognition.
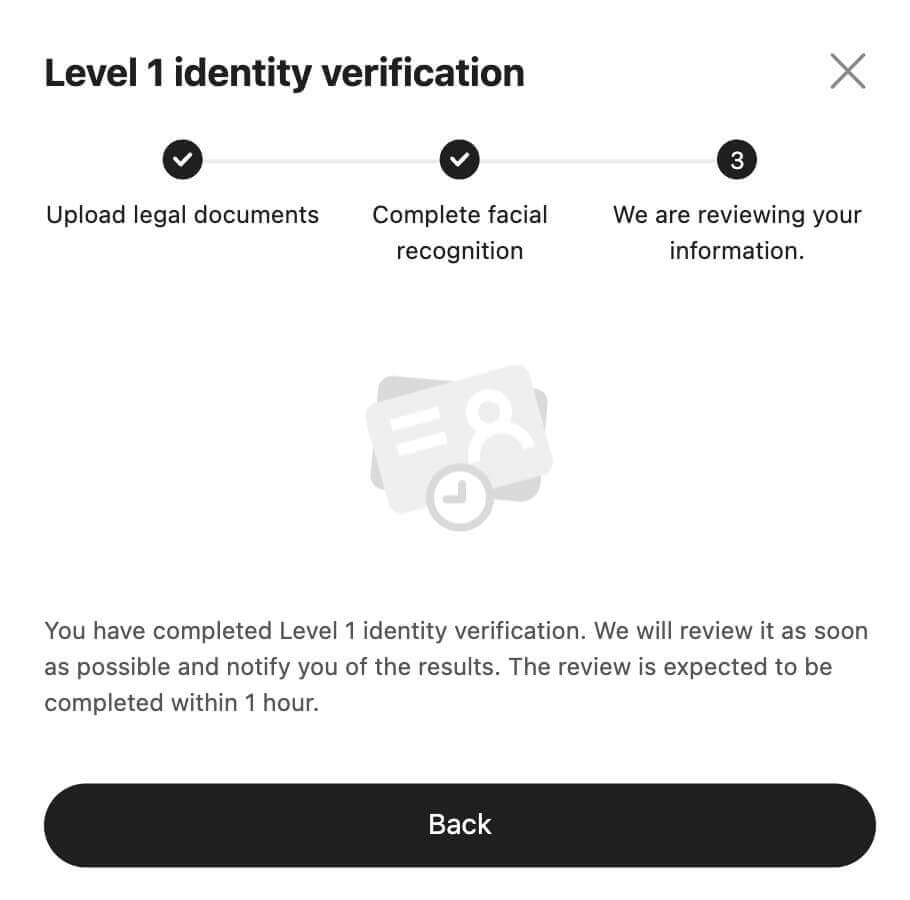
8. After completing the facial recognition verification, please patiently wait for the results. You will be notified of the results by email and or via your website inbox.
Frequently Asked Questions (FAQ)
Why is identity verification necessary
Identity verification is a process used by financial institutions and other regulated organizations to verify your identity. Bitget will verify your identity and conduct a risk assessment to mitigate risk.
How is identity verification related to my access to Bitget services?
As of September 1, 2023, all new users are required to complete level 1 identity verification to access various Bitget services, which include, but are not limited to, depositing and trading digital assets.
As of October 1, 2023, existing users who registered before September 1, 2023, will be unable to make deposits if they haven’t completed level 1 identity verification. However, their ability to trade and make withdrawals will remain unaffected.
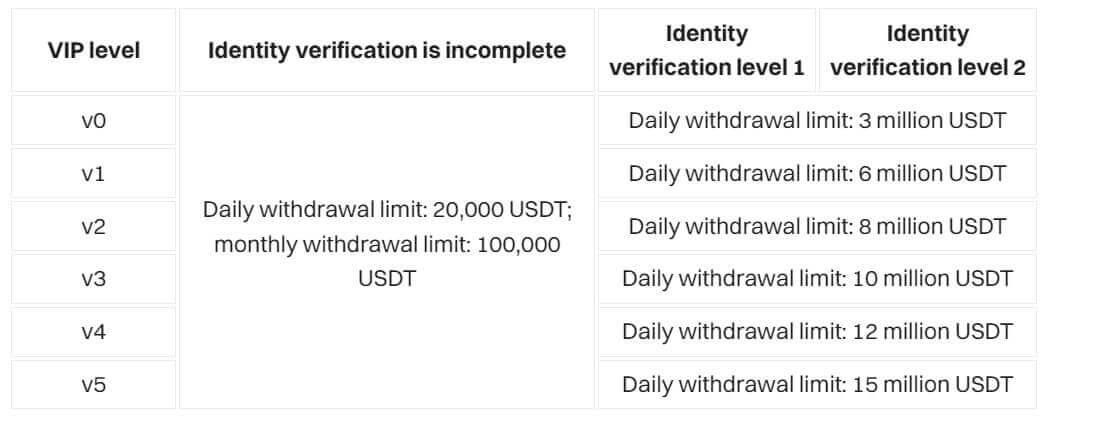
How much can I withdraw per day after completing the identity verification?
For users of different VIP levels, there is a difference in the withdrawal amount after completing identity verification:
I cannot find my location in the country list. Why?
Bitget does not provide services to users from the following countries/regions: Canada (Ontario), Crimea, Cuba, Hong Kong, Iran, North Korea, Singapore, Sudan, Syria, and the United States.
How long does the identity verification process take?
The identity verification process consists of two steps: data submission and review. For data submission, you only need to take a few minutes to upload your ID and pass the face verification. Bitget will review your information upon receipt. The review may take as short as several minutes or as long as an hour, depending on the country and type of ID document you choose. If it takes longer than one hour, contact customer service to check the progress.
Why can’t I make a deposit through my bank after completing identity verification?
If you have completed identity verification through a manual review process, you will not be able to deposit through a bank.
What documents can I use to complete the identity verification?
For level 1 identity verification, you can use documents such as an ID card, passport, driver’s license, or residence permit. You can view the specific types of documents supported after selecting your issuing country.


